Wednesday, October 2, 2013

Rebecca's Crafty Moment This Week


I have decided that I love quilting, I have also decided that I have a ton of fabric but very few pieces that go well together. In the mix I have odd and end pieces but while I was digging through my stash, I found a really cute strip pack that I had picked up at Hancock Fabrics several months ago. My mind says 'it would be so cute as a quilt' while in reality, you need more than one strip pack to make a quilt top. I wanted to make something Fall related this week to spruce up our house. We already have the Bath and Body Works candles in Sweater Weather and Autumn. 

I don't know how many of you have ever joined Craftsy but it is pretty cool. You can find patterns, classes, tutorials, network with other crafty people, and supplies. My favorite part? I've gotten a TON of FREE patterns. I have a favorite saying, if it's free, it's for me. I love free stuff. Now if we could just get free fabric, that would be awesome. 

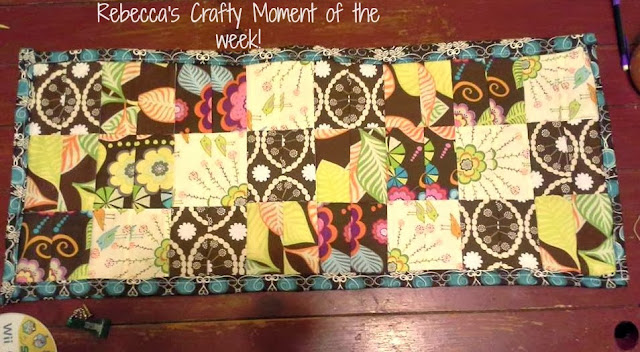
I was looking around the other night and I found a pattern for a table runner that I thought was really simple (best part- it was free) and that fabric I found would be perfect as well for a fall table runner. The pattern can be found here. For this pattern, you need (24) 4 1/2 inch squares, 1/3 to 1/2 of a yard of fabric for the backing, Binding material unless you choose to use the backing fabric, Crib size batting (I cut mine to be 16x36 I believe), a sewing machine, rotary cutter and mat, and an iron. (A camera will also be helpful because we would LOVE to see your creations :) ) 

With the strip pack I had found I took two strips from each design and sewed them together right sides together, pressed the seams to one side and used my 4 1/2 inch square ruler to cut the squares out I was able to get 9 squares out of each piece. I used 6 of each and laid them out into a pattern that I wanted to use, I have become very fond of the diagonal pattern. 


 Next, I took the columns of three and sewed them together, starting on the left and moving to the right. When you are piecing them together, always sew with right sides together. 


 Afterwards, I took the first two columns having a total of six squares laid right sides together and sewed a 1/4 inch seam longways. I found it was easiest to sew two rows at a time and then once you have two sections with 4 rows sewing them together rather than doing row by row. 


 Once you have the top sewn together, you can trip any sides that are not even to give it a nice rectangle shape. Remember to clip any long thread ends. Remember to press the seams flat to one side so it will lay flat. Now it's time to move onto the quilt sandwich. 

Cut your backing and batting a few inches bigger than the quilt top. 

Baste however you prefer to normally do it. At this point you can quilt however you would like. I just used the stitch-in-the-ditch method. Once I finished quilting, I trimmed the batting, folded over the backing a pressed a hem into it so I could use that as the binding. Once the hem was pressed, I continued to fold over the backing to make it the size I wanted for binding, pinned it in place and used a zigzag stitch to finish it off. 


 Here is the finished product, in it's permanent home on my coffee table. 


I am really happy with how it turned out, I am still learning how to do binding. The pattern on Craftsy is free, I would love to see what you guys come up with! 

Stay Crafty,
Rebecca
Wednesday, September 4, 2013

Newton's Law of Crafting

Photo found on jgoode, edited with PicMonkey
As I am here sitting at my desk browsing through Pinterest trying to figure out ways to save my business and gain more fans, I realize that everything I need is here until I actually need it and then at that point the Gremlins have run away with whatever it is. 

So, I have decided to come up with Newton's Laws of Crafting. Here is a brief intro on Sir Issac Newton to bring everyone up to speed. Bet you didn't expect this post to be educational!  
Photo found on Department of History, University of California Irvine

Sir Issac Newton (1642-1727) was a Natural Philosopher and Physicist, he came up with three laws during his lifetime. 
Newton's First Law (Inertia) says that an object at rest, stays at rest as well as an object in motion will stay in motion unless acted on by a external force.
Newton's Second Law says that a force that is applied on an object equals the rate of change of its momentum with time. Force equals mass times acceleration.
Newton's Third Law says that for every action there is an equal and opposite reaction.
Newton also came up with the theory of gravitation.


Now, onto the regularly scheduled post :)
Newton's Laws of Crafting:
First Law- Everything is there until you actually need it and then it is nowhere to be found.
Second Law- You will run out of thread either on the spool or bobbin 3/4 the way through a project. Which will also be right after you come back from a trip to the store.
Third Law- When working on a quilt, Wal-Mart will run out of the scrap pack you need to finish. (Mine has been out of the same one for six months)
Fourth Law- You will realize that what you needed to purchase at the craft store was on sale last week, for 50 percent off, and will not go back on sale in the near future.
Fifth Law- The craft show you really wanted to do quit taking applications a few days ago.
Sixth Law- When you are trying to finish items the night before a festival, all sewing machines in your presence will go on a hiatus and refuse to work.
Seventh Law- No matter what the forecast is, if you plan to do a festival in the summer you will encounter a monsoon with hurricane force winds.
Eighth Law- When you sit down to work on a project, or find one you want to do, you will have all the materials except one.

That is all I can think of for now. Let us know in the comments if you have any to add.

Stay Crafty,
Becka

Thursday, August 29, 2013

Washing away the memories...

Well my husband and I separated for around nine months, during that time new memories were created and we are now trying to wipe them away. Things have changed by leaps and bounds for sure and we recently realized that we needed to wipe away memories and start things fresh. When you have been married for two years, it is hard to start completely over but rearranging your home and getting new furniture is a good start!

We moved into our house in May of 2012 when my husband lost his job, he had this house with his first wife but moved and let a friend rent it, the house ended up in foreclosure and with the lost income, we decided to ride it out as long as we could while trying to get our house back on track.
Note: Home loan re-modification with Bank of America is no walk in the park.

We realized that the furniture being in the same spot, having the same furniture and being in the same routine was going to do nothing but bring us back down after we managed to get our house back. What was the first step? Moving furniture, you have no idea how much it will brighten your mood to just simply move things around. Second step? Acquire new furniture, even if it isn't brand new "new to you" is perfectly acceptable. My brother in law is also trying to 'wash away the memories' so we become the lucky owners of all his old furniture.

All of this has brought out a lot of DIY projects, I have two stepdaughters and they love quotes just about as much as I do. You can find a FREE website where you can print quote pages to color HERE.
 
We have decided to print a bunch of them out, frame them, and decorate our house with them. 
 If you are artistic, you can create your own! They also have a lot of cool pages to color at Doodle Art Alley

I love to color so if I can incorporate coloring into a DIY project and make my house prettier, it is a winner for me. 

What DIY's have you done lately to spruce up your house or to try and wash away memories?

Stay Crafty,
Becka


Thursday, May 9, 2013

Bloglovin!

So I have found this new thing called Bloglovin, it's really neat (no, that wasn't meant as a shameless plug by the way, I really do think it's neat). My favorites is full of blogs that I really love and want to keep up with, however and to be perfectly honest, I have a terrible memory! This is where Bloglovin helps me. It has a button similar to the Pinterest "Pin It" button, this one however shows when the blogs you follow update (Yay!). Rebecca and I are also talking about starting an Instagram account for Crafting for Sanity, we both already have Instagrams and you guys are more then welcome to follow us on there. Fair warning though, some of the stuff really has no rhyme or reason, I shared one picture the other night I took on my Ipod that is from my College Criminal Law book


I still can't believe that this in the book, it probably shouldn't surprise me. 12 years of retail and customer service with 7 in management you would think that I had pretty much seen it all! Not a chance! The inherent stupidity of mankind assures that!

Just wanted to pop in, say Hi! Make sure everyone knew that we hadn't fallen off the world somewhere. Hopefully I'll be updating more since my semester ends after my Ethics final tomorrow.


 <a href="http://www.bloglovin.com/blog/4731485/?claim=79g825rsnx9">Follow my blog with Bloglovin</a>

Thursday, April 4, 2013

My sewing machine is suffering from months of neglect...

Yes, you read that right. My sewing machine is suffering from several months of neglect and I'm not exactly happy about it. Since the separation and divorce process has started, I haven't had a ton of time or motivation to really craft. I've done a few special orders that I made time for but other than that, my sewing machine has been neglected since probably November/December. The last thing I really remember doing on the sewing machine was the rice packs for the festival in Belmont which was early December I believe but I think at that point I just took the ones I had made for the festival in November.

Well today, after finding my thread and the numerous other supplies I needed I finally got to use my sewing machine again. My cousin wanted a rice pack for her shoulder but she didn't want any of the ones I already had made so I made one that is bigger than normal and took almost a full 3lb bag of rice. It finally measured 13 x 6 inches.
 
I realized I really missed sewing. 

Ever since I brought out my sewing machine today, I've had the motivation to start a new project. I haven't decided if I want to create a blanket or a quilt but I want to make something PRETTY I know that much. I've been perusing Pinterest and I've found a few patterns I like as well as some good deals on fabric. 

Who remembers Perler beads?!?
Well a few weeks ago my boyfriend and I were at Michael's and of course, I had a 40% off coupon burning a hole in my pocket. I found a Perler bead kit for $11ish and decided that I would give it a go. It was a huge hit with his 11 year old sister. For some reason though the beads they are producing now do not melt as easy as they use to. The instructions say 10-30 seconds in a circular motion on medium heat, it took at least a minute on high heat to get them to set. 

Here is what we created.... 

Keep checking back to see what other crafty things we come up with. Enjoy your blast from the past.
-Rebecca

Saturday, March 9, 2013

The things I do when I should be doing my homework.......

Everyone always told me that when I made it to college I would take everything more seriously and that it would be different the High School. Well, yes it is, high school didn't come with a $1200 price tag every semester (ok, this semester wasn't that bad. I only took four classes instead of five). Something that didn't change was that I still hate doing homework (especially when it deals with politics, I still don't quite understand why that was required for a Paralegal degree, that and Pre-Calculus). In theory right now  I should be working ahead on American Government, doing Criminal Law tests that my half senile teacher hasn't even said when they are due (trust me, I'm not making this up. I could sit in my seat at the back of the class and play Everquest 2 on my laptop and he wouldn't know). I bet that about here people are starting to say "Amanda! Get to the point!"

                                                 Viola! I give you! THE POINT! hehehehehehe


About a year ago I tried the baked marble thing, somewhere I even have pictures to prove it, but they seem to be hiding at the moment.


The link will take you to the original forum post on Craftster.org where I found it. It's very easy to do, fairly inexpensive, and the only thing that would hold you back here would be your imagination. Mine however hit a road block. I simply couldn't find anything that I like with these! They also tend to be fragile, most of mine broke after my son knocked the box over three or four times and cleaning shards or broken cracked marble out of carpet is no fun! They only bad thing I found was that even though dark colors did crack, by virtue of the dark color, you couldn't see it unless you were looking through the marble at a light.

Then we have today's experiment. 


                           http://candicecharlson.blogspot.com/2012/09/flat-marble-necklaces.html

I thought this was neat, and it didn't look that much different from the marbles. This is what happened.......


The bag on the left is from the Dollar Tree, the bag on the right is from Michael's (I know a lot of people that  like purple. The bag was mostly clear but as you can see it had some dark purple and even some lavender mixed in)


I personally believe that the Dollar Tree is a crafter's heaven. I keep a set of pans specifically for crafting, these came from Dollar Tree and were the perfect size. Coincidentally, I really did like that purple. Shame.


Another wonderful opputunity presented itself though, after the marbles come out of the oven you have to drop them in cold water so that they will crack. We're talking Will-make-your-hand-hurt-frostbite Cold. I needed to clean out the Ice Maker, I haven't been able to replace the filter for the ice make so the ice that comes out when the ice maker is on is kind of gross. I managed to manhandle the fridge out so that the bin would come out and used the nasty ice to get a good sink full of literal ice cold water.


Dollar Tree rocks looked good cracking, the colors look good, had a nice sizzle and they went into the sink,


Not so much with the Michael's rocks. It's a good thing my son wasn't home, I make a point of not swearing around him, but when I saw the rocks as they went into the water I started cussing. The lavender turned an Amber color, which is much more noticeable then the lavender was before. The dark purple turned a dark red/magenta color.


Here is the final product.  In the end I'm pretty sure that the problem was that the oven was to hot. The first tutorial said to bake the marbles at 350 for 30 minutes, the second said 500 for the same time. So in a way I really did cook them. 350 would have been fine in this case, 500 was simply too hot.  I wouldn't call this an epic fail, that would have been if the fire extinguisher had come out.

*sigh* Now it's time to work on homework, stay crafty everyone!
Amanda